About Me

Hello, My Name is Martinique. I have started this blog to keep a diary of my journey into the art of reborn doll making.

Sunday, July 25, 2010

Villena has a New Mommy

Villena went home to her new mommy in Iowa. I miss her already.

I sold her on Etsy. It took about 2 weeks. She is my first doll to sale and my 3rd doll to create I am currently working on another doll to take my mind off of miss Villena. I worked very hard on Villena and put in a lot of time and effort and I think she is beautiful. Her new mom thinks that she is breathtaking.
What did I learn ?
I learn that if I really take my time I can create something beautiful. Once you make the sale you get excited about getting the baby ready for home coming, sealing up the box and taking her to the postoffice. Watching that tracking number and then you see delivered. She made it to her new home. But you still think about her. I hope that it gets better with each doll. 
I am such a sap LOL.  Here is a link to her photo album.

http://s781.photobucket.com/albums/yy93/clothdiapernursery55/Villena%20Reborn%20Doll/

Thursday, June 24, 2010

Villena is finally done

It has taken me forever to finish the doll, but I am finally done. Her name is Villena she is 24 inches long and weighs 4 pounds. I decided that I would take my time and I did. I used Very thin washes of genesis heat set paints. These washes where so thin that they looked like colored water. She has a total of 25 layers of paint to achieve the look that I was looking for.

Villena is a mixture of two sculpts. Her head is from the Riley sculpt by Aleina Peterson and her 3/4 limbs are from the Eden sculpt from Marissa May.

Her hair is extra curly Angora Goat Mohair. It took about 2 1/2 months to root because I wanted her to have a very thick head of hair. And it is very thick. I used about 3 ounces of mohair to root. Now I know that that sounds unbelievable remember this is my second head to root so there was some waste and not all the 3 ounces are in her head.

What I learn with this baby is very very thin washes work very well when painting. I know that I used way to much hair and I didn't use it correctly. The next head that I root I will only use a few strains of hair so that my waste will be very minimal. Her layette was design and sewn by
me.
Here is the link to her photo album

signature ab

Thursday, March 25, 2010

Extra curly kid mohair


This is extra curly kid Mohair. This is the Mohair that I am using on the Riley sculpt from Bountiful Baby. Please click on the pic to get a better image

signature ab

This what Iam working on now

This is my first attempt at the mottling technique. I know that its' not perfect but I just love the fact that it doesn't look painted. there is depth and dimension to her face and I am starting to feel like a artist.

I am in the process of rooting a very full head of hair. I and doing this because all of my daughters where born with very, very thick heads of hair. It's a very long process but the results will be great.


signature ab

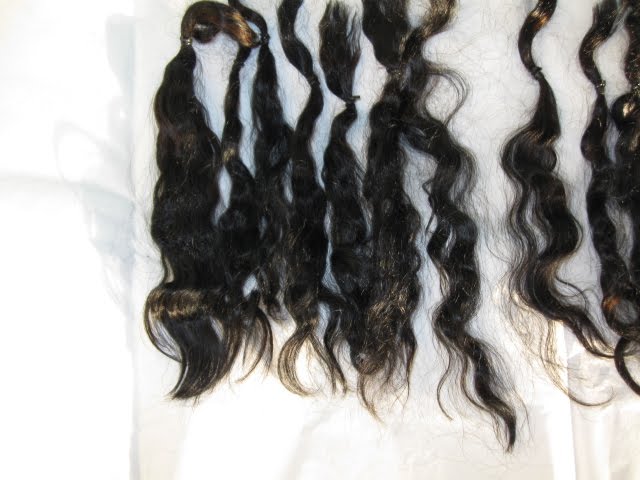
Wavy mohair some black and Black brown


Click on Pic to get larger image.


signature ab

Processing Mohair

Well I have finally gotten around to processing my Mohair.
I used premium colored mohair that is 6 to 7 inches long. I will only be using colors black , brown and chestnut. When you use colored mohair it works as a primer for the darker colors.
This makes the dying process much easier. These pictures are of the wavy texture.

I learned that when dyeing with colored mohair it was drama free. The mohair is soft shinny
and it smell goods


signature ab

Monday, March 8, 2010

Lets Talk Mohair


I am sure that there is a lot of us that have placed an order for mohair and once we got it it was junk. And then there are some that can afford to spend $35 and higher for a 1/2 oz's of good quality mohair.
Well I cant afford that but I still want the best quality. After purchasing yearling mohair from a person on E-Bay. This person was a top seller.I read all her reviews and they where great so I purchase the black and dark brown @ $18.00 ea. The shipping was fast but once I got it It looked nothing like the picture. It was not combed there where some wavy locks but mostly it looked like ratted hair. So I tried to comb it out and saw that the black was half dyed it and had lot of white hair so that hair had to be thrown out.
The texture of the hair was cotton candy. So I recondition it comb and it look better and felt
better but it never reached that silky state THIS HAIR WAS NEVER SILKY . and people are still buying from her.

Rooting with was not good at all try rooting with the texture of cotton candy. I had to use gel to hold Maggie's hair together.

I am a believer that where there is a will there is a way. So I hit the net looking for raw mohair
how to process and how to dye. After 3 days of a intense search I found every thing that I needed.
I will never buy processed Doll Mohair again. Here is a picture of what raw way mohair looks like and I will keep you post on the actual processing of mohair.

More pictures


signature ab

Cute Pictures of Maggie


Here are pictures of Maggie in the outfit that I made her. She is not perfect by no stretch of the imagination but I think that she is very cute.

Rrooting views


signature ab

Maggies Rooting pictures

Here are Maggie's rooting pictures I hope that you enjoyed the . The overall experience was great. I didn't' run into any problems. My only drama was the actual mohair . It was just awful. I paid $18.00 plus shipping. I got it on E Bay for a 100% seller and good review. I believe that it the product was better the look would have been better but the overall process was great

Friday, February 12, 2010

First doll completed


Here are the pictures of my first completed doll .
She has painted hair. The actual painting process was much better this time.
This doll is far from perfect but much better. My drama is still lips I just can't get it together.

P.S I didn't edit the pictures by turning them right side up just click on picture to get a better view.
Well here are her pictures.signature ab

Wednesday, January 6, 2010

Hair Rooting

Hair rooting is coming along just fine. It is a very long process but I am very happy with it.
I broke one needle but it wasn't from rooting I don't even know how I broke it probably not paying attention. I purchase the rooting needles from Spearson Doll bodies I can't remember the price but I got 24 42g needles for a very cheap price cheaper than my favorite supplier BB.

Sorry I don't have any pictures for you it's very cold outside and cloudy will have some next time.
Pink&black Signature

Sunday, January 3, 2010

It's A New Year

Happy New Year to everyone.
I am sorry that I have been away for so long life came along and I had to follow a bit with no internet acess :) .
Since I have been gone I have manage to paint my 4 preemie kits and I have purchase 3 larger kits from my favorite doll kit supplier Bountiful Baby.

I am now ready to start hair rooting. I will be micro rooting with a 42g needle. I will be using some curly yearling angora mohair that I purchase in september This type of hair is suppose to be easier to root.

In the small town that I was visiting I met a wonderful lady that raises prize winning angora goats. She spent a lot of time teaching how to process and color angora mohair. This person who's name I promised not to mention sells her processed and colored angora mohair for $35.00 per 1/2 oz. You can buy 1 pound of premium unprocessed colored angora mohair (meaning natural dark color) for $40.00 or less on the internet. I will never buy Angora yearling mohair again already processed.

Well that's all that I have to report I am currently waiting for my rooting needles to come in so that I can start rooting and I will have pictures for you.
Happy New
Martinique B


Sunday, November 29, 2009

Maya's lips


I just could not get the hang of lip painting. I don't have a clear understanding of how to apply the lip color without it looking like lipstick which is what I didn't want. I will have to do extensive research to locate a tutorial on lip painting that can give me a better understanding. Think that they are simply awful.
What I learn from my first doll painting is that I don't like doll kits under 20 inches everything is just to small and very hard for me to do detail work. I do realized that I have three more preemie kits that I need to practice on and that they will probably frustrate the "H" out of me but I refuse to give up. I know that the more I paint the better that I will be no matter how small the features are.

Over all this was a great experience and I am looking forward to my next preemie doll kit LOL.
I will be starting on her tomorrow.
Pink&black Signature

Maya's Arm and legs


Maya's arms and legs where finished with a very thin wash of Yellow Ocher and thinning medium. I think that this wash gave her over all skin color some depth and it took that dirty look away. If you look very closely at the soles of her feet the light and dark skin tone line is to harsh and should have been blended better. I do like her overall skin tone but I think that it is way to dark for a preemie.
What I learned is that I love the thinning medium it gives you great control with the paint and it did give the skin a little texture.
Pink&black Signature


After painting Maya's hair I knew that I was going to have problems with trying to paint her eyebrow. So I practice the brush strokes with my Loew-cornell comfort liner 18/0 and no matter how many times
I tried it just looked awful. So I began to practice with a pencil and paper and began to see that I had much better control and they looked soft and very real. I went to my local craft store and purchase a Prismacolor pencil. They didn't have soft black or any black pencils and since I didn't know how this was going to turn out I was only welling to buy one pencil so brought the color espresso. As you can see the Espresso color didn't match her hair color but I think that they are pretty good for my first try.
What I learn is that I am much better a drawing them on then painting and that all hair colors should match and that they should be soft colors not hard or harsh. If you click on the pictures you can see them much better.
Pink&black Signature

Maya's painting is done


I used my Princeton Ex. Long Liner 20/0. I did have some problems with paint control. What I learned is that the brush needs to have a lot less paint on it and I need to get better control of my brush. I use the color Carbon Black. I think it was a little bit to strong it should have been a much more softer color. Overall my first hair painting experience was not that bad and I feel with practice I could nail this process with no problem and have a much better out come.


Pink&black Signature